I am sure you already know the security and performance concerns about having a GUI for your Ubuntu server; for any Linux server actually. You are strongly recommended against it. If this is the first time you hear about this, then it is time for you to start googling and do some reading to learn why and how serious the recommendation is.
But you might have your own reasons for needing a GUI for your server (valid or not). After working with Windows for more than a decade, both on the server and the client side (and I am still a windows guy on the client side), I was having hard times to manage a Ubuntu server through a command line when I first started. I just went ahead and installed a GUI on my server, even worse it was a production server. I don’t do that anymore, unless it is a virtual machine on my laptop to test some stuff. But the truth is, it helped me to learn about managing an Ubuntu server. I know while it helped me to perform some tasks faster it probably slowed down my learning process but sure it made me to stick with Ubuntu and learn it.
Well, that being said, if your reason is merely a simpler and faster server management, I do not recommend it and I am not doing it myself anymore.
Now for a light weight desktop environment, Lubuntu is the way to go. There are even some lighter alternatives like Openbox and Fluxbox but they are not as user friendly as Lubuntu. I tried them and inmy case they were killing the idea of having a GUI in the first place. Your case might be different and you might wanna give them a try if you like.
If you install the “lubuntu-desktop” package you can have a full blown Lubuntu desktop but I am sure you wouldn’t want a complete desktop environment. You might try the “lubuntu-core” package which comes with limited applications. Now let’s take it one step further and add the “–no-install-recommends” parameter to the command so it comes with a couple of terminal applications and with a file manager. You can install the missing applications that you need later on.
Install Minimal Lubuntu Desktop
apt-get install lubuntu-core --no-install-recommends
After rebooting the server you should be able to login to your server through the Lubuntu desktop gui. You will notice that all you got is a file manager, 3 different terminal applications and the Desktop Preferences entry in your menu.
Install Some Essential Software
Now let’s install some applications so the desktop becomes usable. Add or remove according to your needs but this is what works me, not too much not too little.
leafpad: Text editor.
lxterminal: A better terminal application, since all the 3 comes with lubuntu-core installation sucks.
file-roller: An archive manager to help with compressing & extracting files, archives. If your not good with tar.
lxrandr: Monitor Settings GUI to change resolution easier.
synaptic: Synaptic Package Manager
firefox: Browser but I prefer Google Chrome myself. Don’t install it if you want to go ahead with Chrome.
apt-get install leafpad lxterminal file-roller lxrandr synaptic firefox
Install Google Chrome from Command Line (terminal)
If you want to install Google Chrome as your browser.
1. First install the key from Google Linux Repository.
wget -q -O - https://dl-ssl.google.com/linux/linux_signing_key.pub | sudo apt-key add -
2. Then add it to your repository list
sh -c 'echo "deb http://dl.google.com/linux/chrome/deb/ stable main" >> /etc/apt/sources.list.d/google-chrome.list'
3. Update your sources.
apt-get update
4. Install Google Chrome
apt-get install google-chrome-stable
Run Google Chrome as Root
Now if you are managing your server with the “root” user rather than going through “sudo” and “su” commands then you will have problems to run Google Chrome as root. Here is how to fix it. This method seems to be more permanent among others.
1. Open “google-chrome” file located in “/usr/bin” with your text editor (leafpad).
leafpad /usr/bin/google-chrome
2. Add ” –user-data-dir” (without the quotes and with leading space) at the very end of the file.
When you finish, the last line of the file should look like this…
exec -a "$0" "$HERE/chrome" "$@" --user-data-dir
3. Save the file and close. You are done.
Boot into Text Mode & Use startx for GUI
You also might want to run your server on the text mode, the command line by default and load the GUI when you need it then turn back to the command line when you are done and logged out.
First change the run level so the server always boots into command line.
Edit file…
/etc/default/grub
This line…
GRUB_CMDLINE_LINUX=""
Should read…
GRUB_CMDLINE_LINUX="text"
Make the changes, save the file then update grub with the command…
update-grub
Now create the file “.xsession” in your home folder.
touch ~/.xsession
with containing the text below…
lxsession -s Lubuntu -e LXDE
Now reboot your server. It should boot into the command line and login.
startx
will take you to the Lubuntu desktop environment, already logged in.
Logout after you are done and you are back to the command line again.
When using an Headless Server, a VPS…
If you are using a VPS (headless server) things will change a little, not too much.
Start with installing the Lubuntu desktop.
apt-get install lubuntu-core --no-install-recommends
Now you need a way to remotely connect to your desktop. For this there are different approaches and each approach have different alternatives. Like 4 years ago, I have spent quite sometime reading about most and tested some of them. I find NX based solutions to be the most efficient.
At the time Nomachine’s NX server/client was fast, lightweight and easy to install, manage and use for me. It was version 3.x. Recently they released a new version 4.x and to my experience this new version fails on all fronts. Maybe I just failed to configure the new version properly but if that’s the case then it is another proof that it is not as user friendly as it was before. So, I decided to move away from Nomachine’s solution.
Well, this time I haven’t spent that much time to investigate the alternatives but a quick search led me to x2go software, which also uses NX Technology and seems to have more features. Free and open source, while Nomachine is free it is not open source. As far as my limited usage, it is just a better replacement.
So, let’s install x2go on the server….
1- Install required package.
2- x2go repository.
3- Update your sources.
4- Install x2go components.
apt-get install python-software-properties
add-apt-repository ppa:x2go/stable
apt-get update
apt-get install x2goserver x2goserver-xsession x2golxdebindings
Now you know that I am using the “root” user to manage my server and I need to have ssh access for my root user. By default Ubuntu 14.04 restrict ssh for root access to key authentication (passwordless). As far as I can remember, this was not the case with 12.04. For the sake of this guide, I will configure ssh so I can authenticate my root user with regular username/password. This may not be a good idea where security concerns are high. I will write about how to use key authentication for root user with some different client software, including x2go, in another post.
Edit your “sshd_config” file…
/etc/ssh/sshd_config
Find and change the line below…
PermitRootLogin without-password
It should read like this…
PermitRootLogin yes
Restart the ssh service…
service ssh start
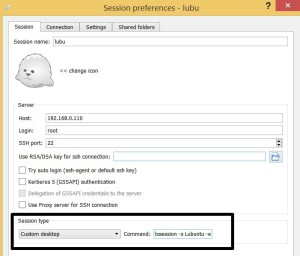
Now go ahead and install the x2go client and create a new session. All setting should be straight forward, except one.
Session type should be “Custom desktop” and required command should read…
lxsession -s Lubuntu -e LXDE
…startx will not work here.
You should be able to remotely connect your VPS Server’s GUI.
Now you can install some essential software.
And since you are using an headless and/or VPS Server, it is more important that server boots into text mode by default and GUI is only loaded when needed. Just follow the first part of “Boot into Text Mode & Use startx for GUI” section. You don’t need the second part since “startx” will not work with x2go connections.


